Your cart is currently empty!
How to Write a Crochet Pattern, Part 4: The Images

This is the 5th post in a 7 part series on how to write an outstanding crochet pattern. The rest of the series can be found here: part 1, part 2, part 3, part 4, part 5, part 6, part 7. There are five posts from me, and two fabulous guest posts from Kate Atherly.Â

There’s more to enabling a crocheter to replicate your design than nailing the numbers and the wording of your pattern. Imagery plays a big, important role, too. (Hint: I’m talking more than just pretty pictures here. But I’ll start with the pictures.)
Photos
Back in the first post of this series, I said that the introduction to your pattern is the second place people look for information that will help them decide whether they want to make your design. The first place is at the photos.
I can not stress enough how important it is to have at least two, if not many more, good photographs of the finished project as a part of your pattern. And I don’t mean this only in regards to selling it.
The photos of the finished design convey extremely important information to the crocheter, even long after they begin to follow the pattern. The photos let her see if her own work is coming out in the correct shape, and if her stitch pattern looks right. Think about how you follow patterns yourself. You don’t stop looking at the photos once you decide to buy the pattern, do you? I’ll bet money that you don’t. You look at the photos as you go, whenever you need to double check your work against the finished sample.
Here are the two most important photos you absolutely must include in your pattern:
- The model shot. This is the image that’s the most important for marketing, because it’s the one that shows crocheters the design in all its glory. (Ok, it doesn’t have to have a model in it.) It’s about a bit more than just showing off the design, though. Just like the introduction does more than just show off your poetical prose, this main image needs to also convey what the project is and a bit about how it’s constructed, which means you have to show enough of the finished item that people looking at the image immediately know where to focus their attention. Just like technical writing needs to be clear and concise, without flowery language or fancy turns of phrase, the photos that accompany a pattern – even the main marketing image – have a very specific job to do. Here’s the main image of the Land & Sea baby blanket pattern, for example:
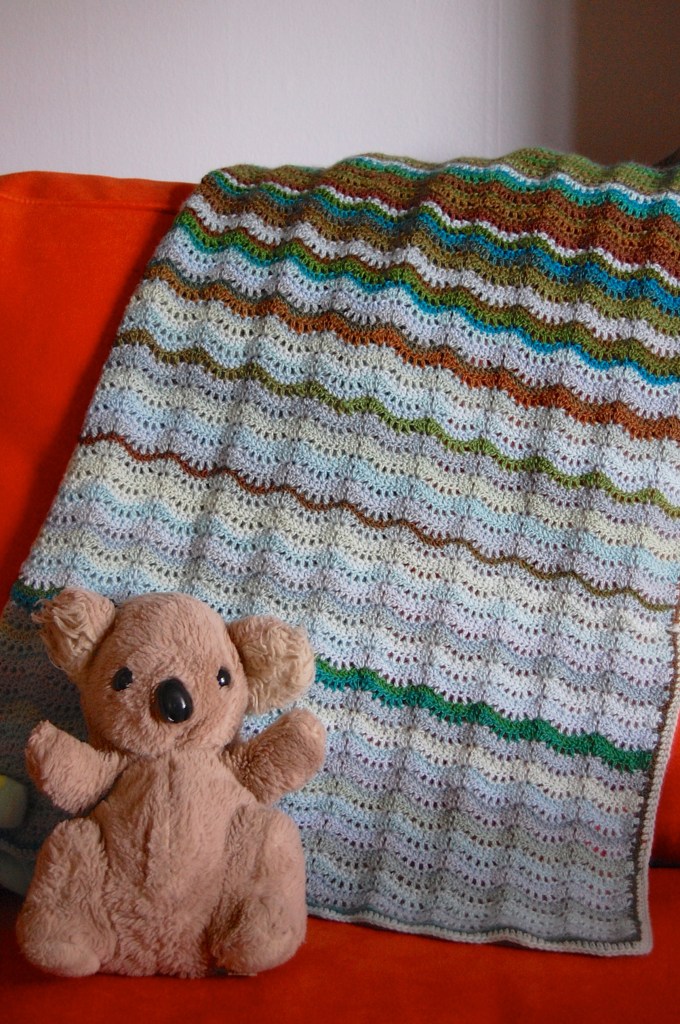
As you can see, the main pattern image doesn’t need to be fancy. It just needs to show exactly what the project is. The stuffed animal in this example indicates that this is a baby blanket, and enough of the blanket is shown that people looking at the image know that it’s a ripple-ish or feather-and-fan stitch pattern, that it involves striping, and that it has a very simple edging. (I designed this pattern a few years ago, but if I were designing its main image now, I’d also make a version that has the name of the pattern in text on the image, to encourage people to pin it on Pinterest. I will likely add such an image to the pages promoting this pattern very soon, actually. Better late than never.)
- The second photograph you must include is one of the full, finished item, styled so that its shape is fully visible. If your pattern is for a slouch hat, make sure you include a photo that shows it modeled with appropriate slouch. If your pattern is for a sweater, make sure you include at least one photo that shows the crocheter very clearly how the sweater is supposed to fit – how snug or relaxed the fit is supposed to be, how long the sleeves are, where the bottom hem falls. (Yes, if you’re thinking that directing a photo shoot for a craft pattern is difficult, you’re right. Be patient, and study up. Caro Sheridan teaches a terrific class on exactly this.) If your pattern is for a shawl, include a photo that conveys the finished shape of the shawl – that means you’ll need a photo of it not being worn as usual, because a shawl being worn does not present its actual shape. For example, here’s a photo of the Resa Shawlette that indicates its finished shape:

I could have used a photo I took of the shawl laid out on the blocking board, but I didn’t like how those turned out, and a photo taken in an actual place is always more interesting than one taken on the floor or some other flat surface. (Granted, I could have been more patient about setting up better lighting…)
Now, those are the two photos you absolutely must include with your pattern. There are others you really should try to include so your crocheter has the best information they need to succeed.
- A detail shot of the stitch pattern if you’re using anything other than rows upon rows of basic stitches. Here’s one of the Resa Shawlette:

Note that I took this detail photo while it was being modeled. That’s a perfectly acceptable thing to do; you don’t need to take detail shots on the floor or a blocking board (though you can; just make sure they’re also pleasing to the eye). This kind of close-up shot of the stitch pattern is more important when you’re using a more involved pattern, or if you’re using colourwork or a cable pattern. In the case of this particular shawlette, especially because I’ll be including of a stitch diagram, a stitch-pattern close-up wouldn’t actually be required. I’m going to include this shot in the pattern, though, because I’m aiming it at first-time shawl makers who may not have much experience with diagrams yet. - Construction details. If your pattern is a garment or other kind of item that is constructed in pieces and then assembled or has any other sort of shaping, etc., make sure you include detail photos of any parts that will help the crocheter understand the instructions and see that she’s following them correctly. For sweater designs, always include a good shot of the shoulder seam, for example. And unless the front and back of a sweater are identical, include a photo of each (this is especially helpful for cardigan designs).
- Note that you don’t have to (and shouldn’t) go overboard with detail photos. You do not need to provide images of every little bit of the design. If a shawl has an intricate edging, do include a photo of it. If it doesn’t, there’s no need to include a detail shot of the edge. If the hemline, neckline and sleeve cuffs of your sweater all involve the same stitch pattern, you only have to show a detail shot of one.
- Alternate versions. If your pattern specifically includes instructions for two or more distinct versions – say, to accommodate different yarn weights – be sure to include a photo of the finished design for each distinct variation. Likewise if you’re sizing the pattern over a very wide range, include an image at least of the sizing extremes – the cardigan in the infant version, say, and also in the adult version. This way crocheters can see the modifications and adaptations you made to size the pattern for such different proportions and dimensions.
Schematic
If your pattern is for a garment of any sort, you must include a schematic drawing, indicating all key measurements (including chest width or circumference, sleeve length, sleeve width or circumference, neck width, length from armpit to hem, etc.). The schematic should include the measurements for every size offered. Look through books and magazines for examples.
Though they look the best, you do not need to use a computer-generated schematic. If you have superduper Illustrator skills, go for it. But if you don’t, a very neatly rendered hand-drawn schematic will be fine. Be sure to scan the drawing, don’t just take a picture of it on your phone and call it a day – the angle will be in some way wonky, and it just won’t be as useful and certainly won’t appear professional. Scan the drawing, clean it up on your computer if needed, and you’ll be good to go.
Stitch Diagrams
These, too, are very useful to include in patterns that involve anything other than rows upon rows (or rounds) of basic stitches. Stitch patterns, motifs, granny squares – all such patterns are vastly improved by the inclusion of stitch diagrams.
Like schematics, you can include hand-drawn diagrams if you need to. I have approximately zero skills creating stitch diagrams, so I ask my tech editor to make them for me. If I didn’t have the extra budget, I’d hand draw them, clearly and neatly.
Charts
Any designs involving stranded colourwork or intarsia, or filet crochet, should include a gridded chart. You can make these in a spreadsheet (resize the the rows and columns into squares), or with fancier software, or, as I’m sure you’re ready to say with me now, you can draw them neatly on graph paper.
So. Images. They’re really important. Photos should be clear – not at all blurry, no flash used, styled to convey important construction information. Schematics should be easy to read. Charts and diagrams should be present, and each should include a key or legend.
Obviously, for any skill required that you don’t have sharpened yet yourself, I suggest you hire someone. A photographer, a graphic designer, etc. And certainly, absolutely, a tech editor. (More from Kate Atherley on the importance of professional editing coming soon.)
PS Affiliate link.
This has been the 5th post in a multi-part series on how to write a top-notch crochet pattern. The previous post was all about the Language & Terminology. The next post is a second guest post from Kate Atherley, where she makes an excellent case for hiring a professional editor, you can find that post right here.